Table of Contents
- Why Build Instead of Buy?
- The Essential Components Explained
- Budget Tiers – $500, $1,000, and $1,500 Builds
- How to Choose Compatible Parts
- Step-by-Step Assembly Guide
- First Boot and Software Setup
- Common Mistakes and How to Avoid Them
- Essential Peripherals – Monitor, Keyboard, Mouse
- Key Takeaways
- Frequently Asked Questions
Why Build Instead of Buy?
If you are reading this, you are probably wondering whether building a gaming PC is really worth the effort when pre-built options from companies like NZXT, CyberPowerPC, and iBUYPOWER exist. Here is the honest answer: learning how to build a gaming PC for beginners saves you money, gives you better components, and teaches you skills that pay off for years.
The cost savings are real. A pre-built gaming PC with an RTX 5070 and an AMD Ryzen 7 9800X3D typically costs $1,600-1,900 from major retailers in 2026. Building the same system yourself costs approximately $1,200-1,400 in parts. That $300-500 difference buys you a better monitor, a quality mechanical keyboard, or simply stays in your wallet. Pre-built manufacturers also tend to cut corners on components you do not see – the power supply, motherboard, and case fans are often the cheapest options available.
Beyond cost, building gives you complete control over every component. You choose the exact GPU, the exact amount of storage, the quality of the power supply, and the thermal solution. When it is time to upgrade, you know exactly what is in your system and can swap individual parts rather than replacing the entire machine.
The process itself is less intimidating than it looks. Modern PC building is essentially adult Lego – components are designed to fit together in specific ways, and if something does not click into place easily, you are probably doing it wrong. The entire assembly takes 2-3 hours for a first-timer. By the end, you will have a machine you built with your own hands that outperforms anything at the same price from a shelf.

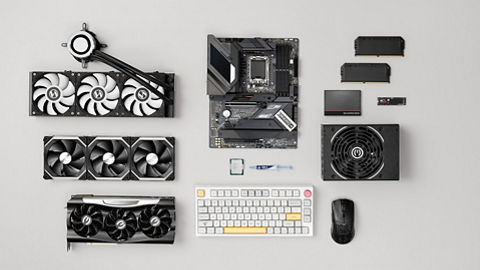
The Essential Components Explained
Every gaming PC needs seven core components. Understanding what each one does will help you make informed purchasing decisions. Here is the breakdown for 2026:
CPU (Central Processing Unit): The brain of your computer. For gaming, the CPU handles game logic, physics calculations, AI behavior, and communication with other components. In 2026, the two main choices are AMD Ryzen and Intel Core Ultra. AMD’s Ryzen 7 9800X3D is the undisputed best pure gaming CPU – its second-generation 3D V-Cache technology delivers 25-35% higher frame rates than Intel’s best offerings. The Ryzen 5 9600X ($180) offers excellent gaming-per-dollar value with six Zen 5 cores. Intel’s Core Ultra 7 270K Plus ($300) provides competitive gaming performance and strong productivity capabilities, making it a solid choice for creators who also game. However, for pure gaming, AMD’s X3D chips remain the clear winners.
GPU (Graphics Processing Unit): The most important component for gaming performance. The GPU renders every frame you see on screen. NVIDIA’s GeForce RTX 50 series launched in early 2026, with the RTX 5070 ($599) serving as the sweet spot for 1440p gaming with DLSS 4 support, and the RTX 5080 ($999) targeting 4K gaming at high refresh rates. The RTX 5060 Ti ($379) handles 1080p excellently and manages 1440p at high settings. AMD’s Radeon RX 7000 series (RX 7700 XT, 7800 XT, 7900 XTX) remain available at reduced prices and offer strong value. Your GPU typically consumes the largest share of your budget – and it should.
Motherboard: The circuit board that connects all your components. AMD Ryzen 9000 series CPUs use the AM5 socket and require 600-series motherboards (B650, X670). Intel Core Ultra 200 series uses LGA 1851. Key features to look for: number of M.2 SSD slots, USB port count, WiFi inclusion, and VRM quality (which determines how well the board delivers power to the CPU).
RAM (Random Access Memory): Short-term memory your PC uses for active tasks. For gaming in 2026, 32GB of DDR5 RAM is the standard recommendation – 16GB is no longer enough for modern AAA titles that increasingly push against that ceiling. DDR5-6000 with CL30 timing offers the best performance-to-price ratio for AMD AM5 systems, while Intel Core Ultra 200 platforms benefit from DDR5-6400 CL32. A quality 32GB DDR5-6000 kit currently costs under $100, making this an easy choice.
Storage: NVMe SSDs are the standard for gaming PCs. A 1TB NVMe SSD ($60-80) is the minimum – modern games routinely require 50-150GB each. Many builders use a 1TB NVMe as their boot drive and add a 2TB secondary drive for their game library. Never use a traditional hard drive (HDD) as your primary gaming drive – the load time difference is massive.
Power Supply Unit (PSU): Converts wall power to the voltages your components need. Do not cheap out here – a poor PSU can damage every component in your system. Buy from reputable brands (Corsair, Seasonic, be quiet!, Thermaltake) and get at least 80 Plus Bronze efficiency rating. Power requirements have increased with the RTX 50 series: a 700-750W PSU is recommended for RTX 5070 builds, while 850-950W is necessary for RTX 5080 builds.
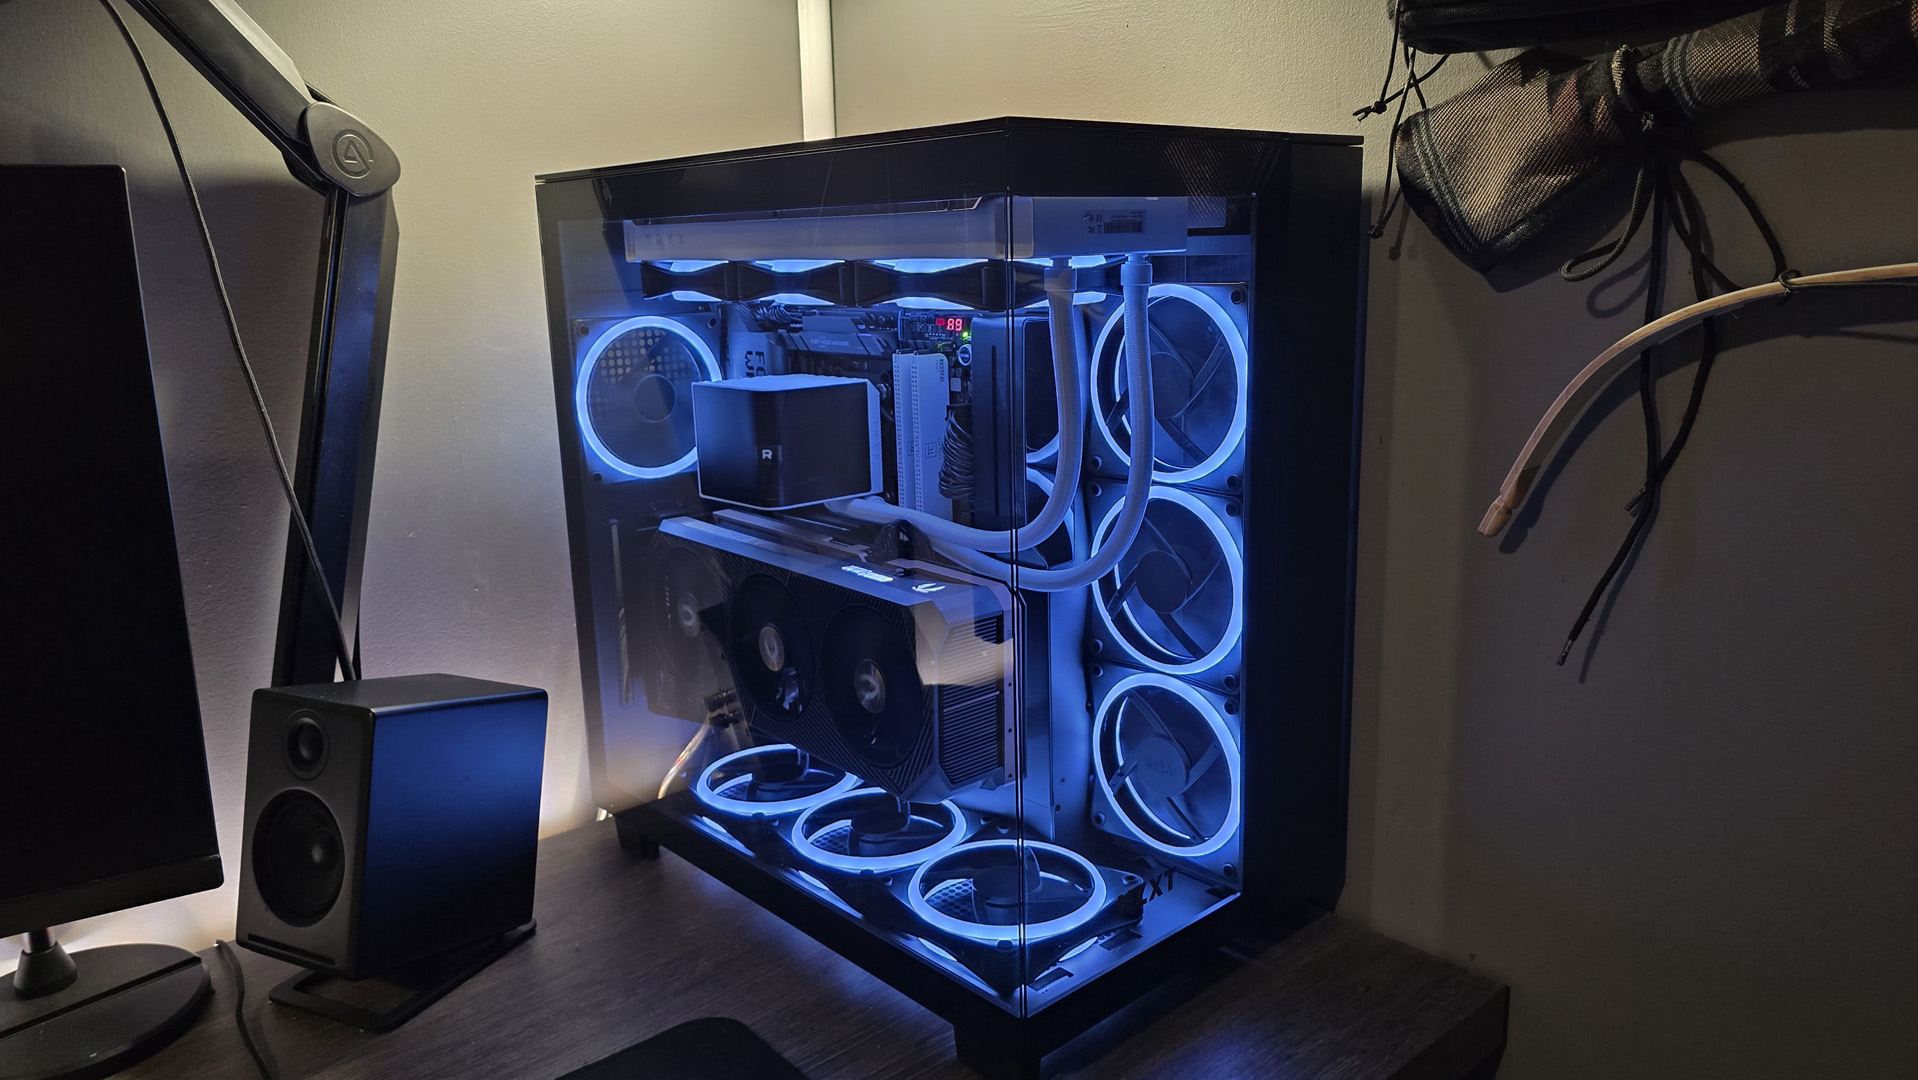
Case: The enclosure that holds everything. Choose a case with good airflow (mesh front panel is ideal), enough room for your GPU (measure length – modern GPUs can be over 300mm), and a layout that makes cable management possible. Popular beginner-friendly cases include the NZXT H5 Flow, Corsair 4000D Airflow, and Fractal Design Pop Air, all priced between $80-110.
Budget Tiers – $500, $1,000, and $1,500 Builds
Here are three build configurations that represent great value at each price point as of early 2026:
$500 Budget Build (1080p gaming at 60+ FPS):
CPU: AMD Ryzen 5 7600 ($150) | GPU: AMD RX 7600 ($230) | Motherboard: B650 ATX ($110) | RAM: 16GB DDR5-5600 ($45) | Storage: 1TB NVMe SSD ($60) | PSU: 550W 80+ Bronze ($50) | Case: Thermaltake Versa H18 ($50). This build handles every current game at 1080p with medium to high settings. It uses the AM5 platform, which gives you an upgrade path to Ryzen 9000 series CPUs down the road – a significant advantage over dead-end platforms. Total: approximately $695, but sales and bundle deals frequently push this under $600.
$1,000 Mid-Range Build (1440p gaming at 60+ FPS):
CPU: AMD Ryzen 5 9600X ($180) | GPU: NVIDIA RTX 5060 Ti 16GB ($379) | Motherboard: B650 ATX ($120) | RAM: 32GB DDR5-6000 CL30 ($90) | Storage: 1TB NVMe SSD ($65) | PSU: 700W 80+ Gold ($85) | Case: Corsair 4000D Airflow ($95). This is the sweet spot for most gamers. The RTX 5060 Ti delivers excellent 1440p performance at high settings and handles ray tracing well thanks to its Blackwell architecture. The 16GB of VRAM ensures longevity as games demand more memory. This build will remain capable for 3-4 years with minimal upgrades. Total: approximately $1,014.
$1,500 High-End Build (1440p 144Hz and 4K gaming):
CPU: AMD Ryzen 7 9800X3D ($400) | GPU: NVIDIA RTX 5070 ($599) | Motherboard: B650 ATX ($130) | RAM: 32GB DDR5-6000 CL30 ($90) | Storage: 2TB NVMe SSD ($110) | PSU: 750W 80+ Gold ($95) | Case: Fractal Design Pop Air ($95) | CPU Cooler: Thermalright Peerless Assassin 120 ($35). This build crushes 1440p at 144+ FPS with DLSS 4 enabled and handles 4K gaming at 60+ FPS in most titles. The 9800X3D’s 3D V-Cache gives it unmatched gaming performance, and the RTX 5070 is the best value high-end GPU in 2026. Total: approximately $1,554.

How to Choose Compatible Parts
Part compatibility is the biggest worry for beginners learning how to build a gaming PC for beginners, but it is actually straightforward if you follow these rules:
Use PCPartPicker (pcpartpicker.com). This free tool is your best friend. Enter your parts and it automatically checks compatibility, flags conflicts, and estimates total wattage. It also compares prices across major retailers. Every build listed in this guide was verified through PCPartPicker.
CPU and motherboard must match. AMD Ryzen 7000 and 9000 series CPUs use the AM5 socket and require 600-series motherboards (B650, X670). Intel Core Ultra 200 CPUs use LGA 1851 and require 800-series boards. You cannot put an AMD CPU in an Intel board or vice versa.
RAM must match the motherboard. AM5 motherboards use DDR5 RAM exclusively. Intel LGA 1851 boards also use DDR5. DDR4 is no longer compatible with current-generation platforms from either manufacturer. When buying DDR5, check which speeds your motherboard’s QVL (Qualified Vendor List) supports for guaranteed compatibility.
GPU length must fit the case. High-end GPUs can be over 300mm (12 inches) long, and the RTX 5080 models can exceed 330mm. Check both the GPU’s dimensions and your case’s maximum GPU clearance. Most mid-tower cases support GPUs up to 350-370mm.
PSU wattage must cover your components. PCPartPicker estimates your system’s total power draw. Add 20-30% headroom above that estimate. RTX 50 series cards have higher power requirements than their predecessors, so be generous with your PSU wattage. If your system draws an estimated 500W, go with 700W or 750W.
Step-by-Step Assembly Guide
You have your parts. Here is how to put them together:
Before you start: Work on a clean, flat surface. Touch a metal object to discharge static before handling components. Have a Phillips head screwdriver (size #2) ready – it is the only tool you need. Keep your motherboard manual accessible for reference.
Step 1 – Install CPU: Open the CPU socket on your motherboard by lifting the retention arm. Align the golden triangle on the CPU corner with the triangle on the socket. Gently place the CPU into the socket – it should drop in without force. Close the retention arm.
Step 2 – Install CPU cooler: If using the stock cooler (included with most AMD Ryzen non-X3D CPUs), apply the pre-applied thermal paste and mount according to the included instructions. If using an aftermarket cooler (required for the 9800X3D, which does not include a stock cooler), apply a pea-sized dot of thermal paste to the center of the CPU and mount the cooler per its manual.
Step 3 – Install RAM: Open the clips on the RAM slots. For two sticks, use slots 2 and 4 (counting from the CPU) – this enables dual-channel mode. Align the notch on the RAM stick with the slot and press firmly until both clips click into place. This requires more force than you might expect.
Step 4 – Install M.2 SSD: Locate the M.2 slot on your motherboard (usually between the CPU and first PCIe slot). Remove the heatsink if present. Insert the SSD at a 30-degree angle, then press down and secure with the screw. Replace the heatsink.
Step 5 – Install motherboard in case: Install the I/O shield (if separate from the motherboard). Place the motherboard on the standoffs in the case, aligning the screw holes. Secure with the included screws – finger tight, then a quarter turn with the screwdriver. Do not overtighten.
Step 6 – Install PSU: Mount the power supply in the bottom rear of the case (fan facing down if your case has a bottom vent). Route cables through the back of the case for cable management. Connect the 24-pin ATX cable to the motherboard, the 8-pin CPU cable near the top of the board, and PCIe power cables for your GPU. RTX 50 series cards use the 12V-2×6 power connector – make sure your PSU includes one or use the adapter included with your GPU.
Step 7 – Install GPU: Remove the appropriate PCIe slot covers from the back of the case. Insert the GPU into the top PCIe x16 slot on the motherboard, pressing firmly until the retention clip clicks. Secure with screws. Connect the power cable from the PSU.
Step 8 – Connect front panel: Connect the case’s front panel connectors (power button, reset button, USB, audio) to the appropriate headers on the motherboard. Your motherboard manual has a diagram showing which pins are which. This is the fiddliest part of the build – take your time.
First Boot and Software Setup
Power on your PC by pressing the front panel power button. If everything is connected correctly, you will see your motherboard’s BIOS screen. If nothing appears, do not panic – check that the monitor is connected to the GPU (not the motherboard), verify all power cables are seated firmly, and ensure RAM is clicked into place.
BIOS setup: Enter BIOS (usually by pressing Delete or F2 during startup). Enable EXPO (for AMD systems) or XMP (for Intel systems) to run your RAM at its rated speed – DDR5 defaults to 4800 MHz without this setting, and enabling EXPO/XMP to get your full DDR5-6000 speed can improve gaming performance by 10-15%. Set your boot priority to USB first (for Windows installation). Save and exit.
Install Windows: Create a Windows 11 installation USB using Microsoft’s Media Creation Tool on another computer. Insert the USB, boot from it, and follow the installation prompts. Install Windows on your NVMe SSD. A Windows 11 license costs $139 from Microsoft, though legitimate OEM keys are available from authorized resellers for $20-40.
Install drivers: After Windows is installed, download and install GPU drivers from NVIDIA’s or AMD’s website (GeForce Experience/NVIDIA App or AMD Adrenalin). Install your motherboard’s chipset drivers from the manufacturer’s website. Windows Update will handle most other drivers automatically.
Install essential software: Steam, Discord, a web browser of your choice, and any game launchers you need (Epic Games Store, EA App, Battle.net). Run a benchmark like 3DMark Time Spy (free demo on Steam) to verify everything is performing as expected.
Common Mistakes and How to Avoid Them
Even experienced builders make mistakes. Here are the most common ones when learning how to build a gaming PC for beginners:
Forgetting to enable EXPO/XMP. Your DDR5-6000 RAM will run at 4800 MHz by default unless you enable EXPO (AMD) or XMP (Intel) in BIOS. This single setting can improve gaming performance by 10-15%. It takes 30 seconds to enable and is the most common performance left on the table.
Connecting the monitor to the motherboard instead of the GPU. Your motherboard has video outputs, but these connect to the CPU’s integrated graphics (if it has any), not your GPU. Always plug your monitor into the GPU’s ports. Note that AMD’s Ryzen 9800X3D does not have integrated graphics, so connecting to the motherboard will produce no signal at all.
Not connecting GPU power properly. Modern GPUs require dedicated power connections. RTX 50 series cards use a single 12V-2×6 connector, while older cards may need two or three 8-pin connectors. If your GPU does not power on, double-check that the power cable is fully seated on both ends.
Cheaping out on the PSU. A $30 no-name power supply can destroy every component in your system. Stick to reputable brands and at least 80 Plus Bronze certification. The PSU is the one component where saving $20 can cost you $1,000. With RTX 50 series power demands, this advice matters more than ever.
Panicking when the PC does not boot the first time. First boot failure is common and almost always caused by a simple connection issue – unseated RAM, a loose power cable, or a missed switch. Systematically check every connection before assuming something is broken.
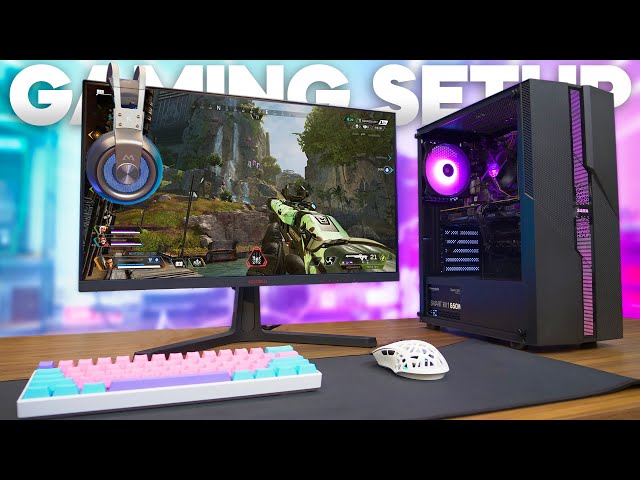
Essential Peripherals – Monitor, Keyboard, Mouse
Your gaming experience is only as good as the peripherals you use to interact with it. Here are recommendations for each budget tier in 2026:
Monitor: For the $500 build, a 1080p 144Hz IPS monitor ($130-180) like the AOC 24G2 is ideal. For the $1,000 build, step up to a 1440p 165Hz+ IPS monitor ($200-300) like the Gigabyte M27Q or Dell S2722DGM. For the $1,500 build, consider a 1440p 240Hz panel ($300-400) for competitive gaming or a 4K 144Hz monitor ($400-550) for visual fidelity. Monitor prices have dropped significantly in 2026, making high refresh rate panels more accessible than ever.
Keyboard: Mechanical keyboards provide better tactile feedback and durability than membrane keyboards. Budget options like the Royal Kludge RK84 ($50) and Keychron C3 ($35) offer genuine mechanical switches at entry-level prices. Mid-range options like the Keychron Q1 ($150) offer premium build quality and hot-swappable switches for customization.
Mouse: For gaming, look for a lightweight mouse (under 80g) with a good optical sensor. The Logitech G305 ($40) is a fantastic wireless budget option. The Razer DeathAdder V3 ($70) and Logitech G Pro X Superlight 2 ($140) are top competitive choices. Mouse preference is extremely personal – hand size and grip style matter more than brand.
Key Takeaways
- Building a gaming PC saves $300-500 compared to pre-built systems and gives you better components
- Use PCPartPicker to verify compatibility and compare prices before purchasing anything
- The GPU is the most important component for gaming – allocate 35-45% of your budget here
- AMD’s Ryzen 7 9800X3D is the best gaming CPU in 2026, while the Ryzen 5 9600X offers the best budget value
- NVIDIA’s RTX 5070 ($599) is the sweet spot GPU for 1440p gaming, while the RTX 5060 Ti ($379) handles 1080p and capable 1440p
- 32GB DDR5-6000 CL30 is the standard RAM recommendation – 16GB is no longer sufficient for modern titles
- Do not cheap out on the power supply – a poor PSU can damage your entire system
- Assembly takes 2-3 hours and requires only a Phillips head screwdriver
- Enable EXPO/XMP in BIOS after your first boot to get full RAM performance
Frequently Asked Questions
Is it hard to build a gaming PC with no experience?
No. Modern PC building is designed to be accessible. Components only fit in the correct orientation, connectors are standardized, and the physical assembly process is straightforward. If you can follow instructions and use a screwdriver, you can build a PC. Follow a video tutorial (JayzTwoCents, Linus Tech Tips, and Gamers Nexus all have excellent build guides) alongside this written guide for the best experience.
How to build a gaming PC for beginners on a tight budget?
Focus your spending on the GPU and CPU, and save on everything else. The AMD Ryzen 5 7600 paired with an RX 7600 delivers excellent 1080p gaming for under $700 total. Use a basic but reliable case. Skip RGB lighting. Buy from sales events (Black Friday, Prime Day, Micro Center in-store deals). The used market – particularly for previous-generation GPUs like the RTX 4070 or RX 7800 XT – offers significant savings if you buy from reputable sellers.
How long does a gaming PC last before needing upgrades?
A well-built mid-range gaming PC typically lasts 3-5 years before needing a major upgrade (usually the GPU). The CPU, RAM, and storage often remain viable for 5-7 years. When it is time to upgrade, the modular nature of a custom build means you replace only the specific component that has become a bottleneck, rather than buying an entirely new system. Choosing the AM5 platform gives you a longer upgrade path since AMD has committed to supporting the socket for multiple generations.
Do I need a CPU cooler or is the stock one sufficient?
AMD’s Ryzen 5 9600X and Ryzen 7 9700X include stock coolers that are adequate for default clock speeds. The Ryzen 7 9800X3D and Ryzen 9 processors do not include stock coolers and require an aftermarket solution. Intel’s Core Ultra 200 K-series CPUs also lack stock coolers. If you want lower noise levels or plan to push your system hard, an aftermarket cooler is recommended. The Thermalright Peerless Assassin 120 ($35) and Noctua NH-U12S ($50) are excellent air cooler options. Liquid cooling (AIO) is not necessary for most builds but offers better thermal performance and aesthetics at $70-150.